
AssetBundleつくってみよう2(NGUI Atlas)

前回から引き続きAssetBundleです。
前回簡単なprefabのダウンロードができたので
今回はNGUIのAtlasのダウンロードをやってみようかと思います。
##Atlasの作成
画像素材はこちらからお借りしました
シアンのゆりかご
50匹のモンスター画像を用意しました。
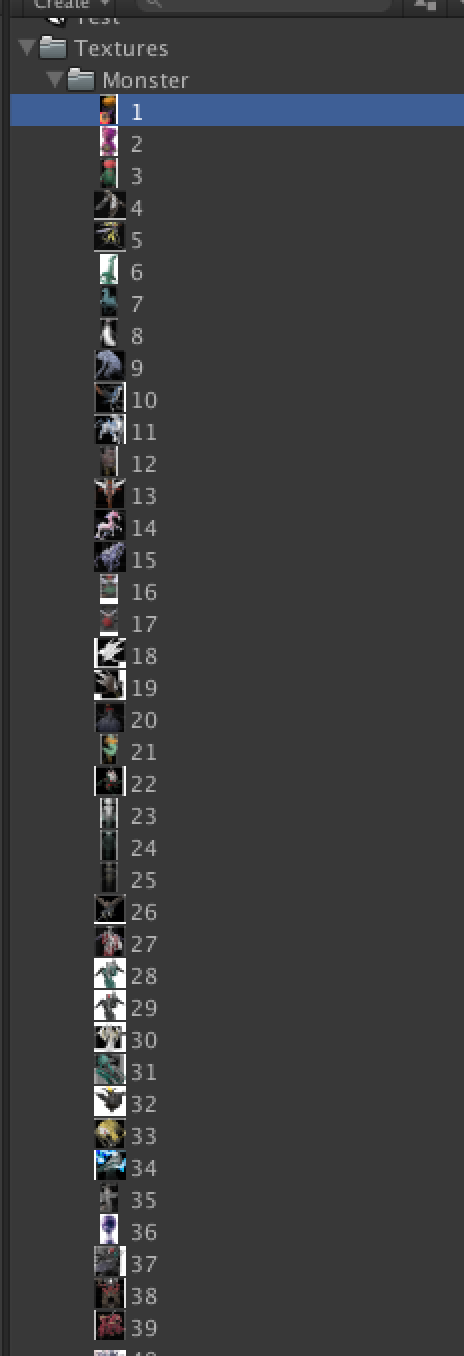
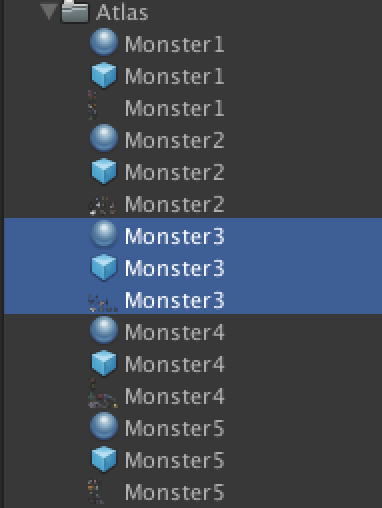
こちらを10匹ずつAtlas化して5つにしました。
##AssetBundle作成
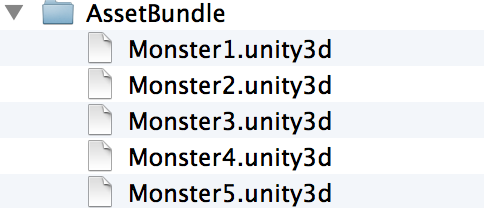
5つのAssetBundleを作成しました
一つにしてしまってもいいのでしょうけれど、複数ダウンロードをやってみたかったので
一つのbundleにprefab,mat,pngを入れます。
こちらをサーバーにアップロードして次は表示準備
##プロジェクト作成
AssetBundleを作成したのとは別プロジェクトを用意
せっかくなのでカードリストのようなレイアウトを用意
###scroll viewの用意
ダウンロードしたモンスターがScrollViewに出るようにUI RootのしたにScrollView を作成
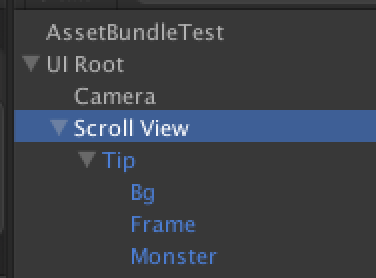
###モンスターを表示するprefab
モンスター一匹を表示するprefabを下記のような感じで作成
Monsterの所にAssetBundleから落としてきた画像を入れる感じ


##ソースを書くよ! 動かすまで2時間以上かかってしまった。
 using System;
using UnityEngine;
using System.Collections;
using System.Collections.Generic;
 public class CachingLoadExample2 : MonoBehaviour {
	public Transform scrollView;
 	// AssetBundleのおいてある場所のパス
	private const string BundleURL = "AssetBundleのおいてある場所のパス";
	// ダウンロードするAssetBundleのリスト
	private readonly string[] bundleList = new string[]
	{
		"Monster1",
		"Monster2",
		"Monster3",
		"Monster4",
		"Monster5",
	};
 	// アセットのバージョン 今回は固定で0でいいや
	private int version = 0;
	// ダウンロードが完了した数
	private int endDownloadCount;
	// ダウンロードしたアセット
	private Dictionary<string, AssetBundle> assetBundleMonsterAtlasList;
	// 表示するモンスターのID = 画像の名前
	private List<int> monsterIdList = new List<int>()
	{
		1,2,3,4,5,6,7,8,9,10,
		11,12,13,14,15,16,17,18,19,20,
		21,22,23,24,25,26,27,28,29,30,
		31,32,33,34,35,36,37,38,39,40,
		41,42,43,44,45,46,47,48,49,50,
	};
  	void Start() {
		// キャッシュのクリア
		//Caching.CleanCache();
 		assetBundleMonsterAtlasList = new Dictionary<string, AssetBundle>();
		endDownloadCount = 0;
 		StartCoroutine(DownloadAllImage());
	}
 	IEnumerator DownloadAllImage()
	{
		// キャッシュシステムの準備が完了するのを待ちます
		while (!Caching.ready)
			yield return null;
 		string url = BundleURL + bundleList[endDownloadCount] + ".unity3d";
 		using(WWW www = WWW.LoadFromCacheOrDownload (url, version)){
			yield return www;
			if (www.error != null)
				throw new Exception("WWWダウンロードにエラーがありました:" + www.error);
 			AssetBundle bundle = www.assetBundle;
			assetBundleMonsterAtlasList.Add(bundleList[endDownloadCount], bundle);
 			// メモリ節約のため圧縮されたアセットバンドルのコンテンツをアンロード
			//bundle.Unload(false);
 			www.Dispose();
		}
 		endDownloadCount++;
		Debug.Log ("download" + endDownloadCount + " / " + bundleList.Length);
 		// 次があれば次のbundleをダウンロード
		if(endDownloadCount != bundleList.Length)
		{
			StartCoroutine(DownloadAllImage());
		}
		else
		{
			DownLoadComplete();
		}
	}
 	// ダウンロード完了
	public void DownLoadComplete()
	{
		Debug.Log ("Download Complete");
		for(int i = 0; i < monsterIdList.Count; i++)
		{
			GameObject tip = Instantiate(Resources.Load ("Prefabs/Tip")	) as GameObject;
			tip.transform.parent = scrollView;
			tip.transform.localScale = Vector3.one;
			tip.transform.localPosition = new Vector3(i % 4 * 110 - 160, Mathf.Floor(i / 4) * -110, 0);
			UISprite monsterSprite = tip.transform.FindChild("Monster").GetComponent<UISprite>();
 			// DictionaryからAssetBundle取得
			string bundleName = "Monster" + (int)(Mathf.Floor(i / 10) + 1);
			AssetBundle bundle =  assetBundleMonsterAtlasList[bundleName];
 			// AssetBundleからUIAtlasをインスタンス化
			string atlasName = "Monster" + (int)(Mathf.Floor(i / 10) + 1);
			UIAtlas atlas = bundle.Load(atlasName, typeof(UIAtlas)) as UIAtlas;
 			monsterSprite.atlas = atlas;
			monsterSprite.spriteName = (i + 1).ToString();
		}
		// ScrollViewのスクロールをリセット
		scrollView.GetComponent<UIScrollView>().ResetPosition();
	}
}
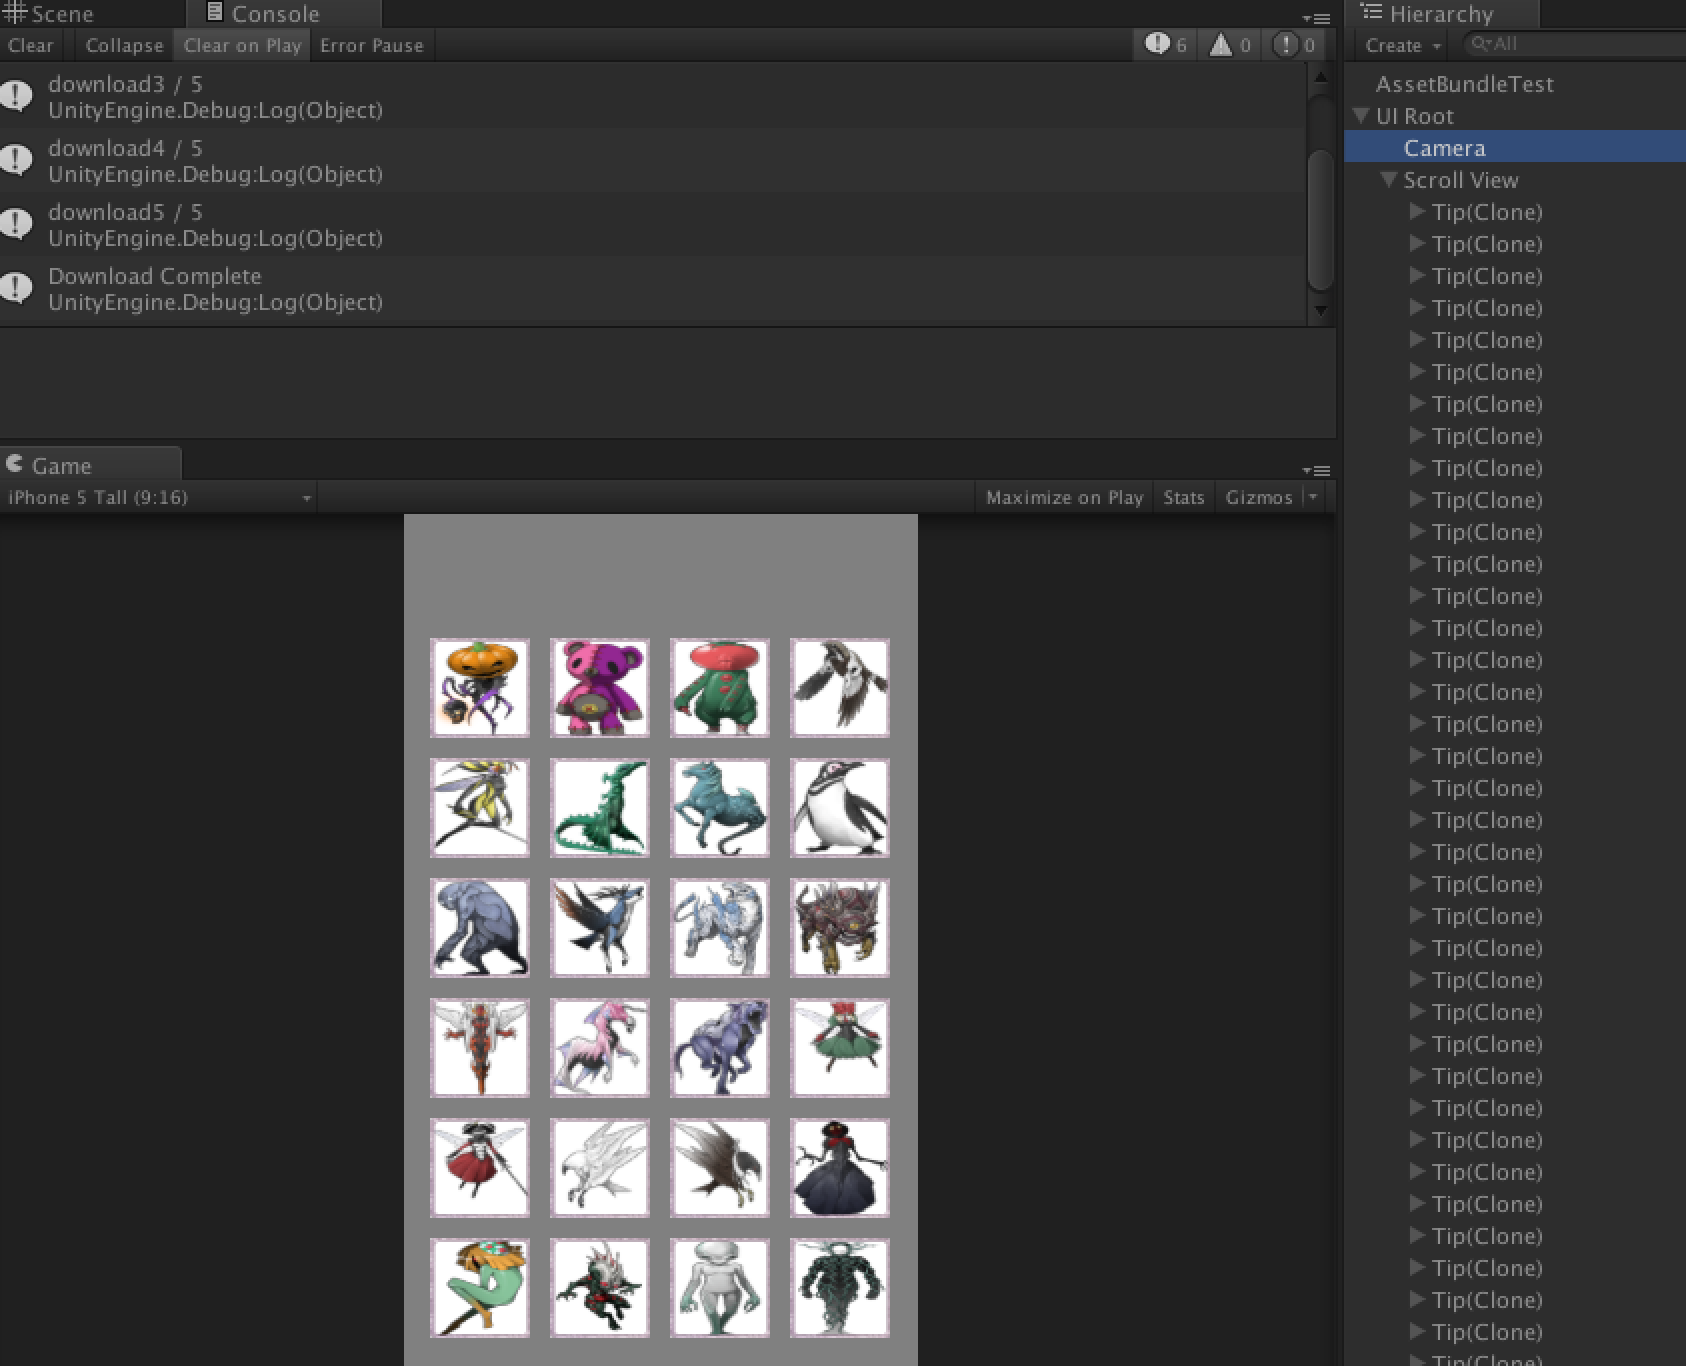
###実行結果
ばっちり読み込まれた
##iosでも実行だ〜
普通にビルドしたら出なかった・・・。どうやらAssetBundleの設定が必要らしい
デフォルトのままだとWebView用のAssetBundleみたいなのでソースを修正
ここを参考に修正
 // C# の例
// プロジェクト ウィンドウの選択されたオブジェクトからアセットバンドルを作成
// コンパイルした後は "Menu" -> "Assets" へ移動して選択肢から一つを選択して
// アセットバンドルをビルド
 using UnityEngine;
using UnityEditor;
 public class ExportAssetBundles {
	[MenuItem("Assets/Build AssetBundle From Selection - Track dependencies")]
	static void ExportResource () {
		// 保存ウィンドウのパネルを表示
		string path = EditorUtility.SaveFilePanel ("Save Resource", "", "New Resource", "");
		if (path.Length != 0) {
			// アクティブなセレクションに対してリソースファイルをビルド
 			// https://gist.github.com/yaeda/5410868 ここを参考に修正
			Object[] selection =
				Selection.GetFiltered (typeof(Object), SelectionMode.DeepAssets);
 			// for Android
			BuildPipeline.BuildAssetBundle(Selection.activeObject,
			                               selection, path + ".android.unity3d",
			                               BuildAssetBundleOptions.CollectDependencies |
			                               BuildAssetBundleOptions.CompleteAssets,
			                               BuildTarget.Android);
 			// for iPhone
			BuildPipeline.BuildAssetBundle(Selection.activeObject,
			                               selection, path + ".iphone.unity3d",
			                               BuildAssetBundleOptions.CollectDependencies |
			                               BuildAssetBundleOptions.CompleteAssets,
			                               BuildTarget.iPhone);
 			// for WebPlayer
			BuildPipeline.BuildAssetBundle(Selection.activeObject,
			                               selection, path + ".unity3d",
			                               BuildAssetBundleOptions.CollectDependencies |
			                               BuildAssetBundleOptions.CompleteAssets,
			                               BuildTarget.WebPlayer);
 			Selection.objects = selection;
 		}
	}
 	[
	 MenuItem("Assets/Build AssetBundle From Selection - No dependency tracking")]
	static void ExportResourceNoTrack ()
	{
		// 保存ウィンドウのパネルを表示
		string path = EditorUtility.SaveFilePanel ("Save Resource", "", "New Resource", "unity3d");
		if (path.Length != 0) {
			// アクティブなセレクションに対してリソースファイルをビルド
 			BuildPipeline.BuildAssetBundle (
				Selection.activeObject,
				Selection.objects, path);
		}
	}
}
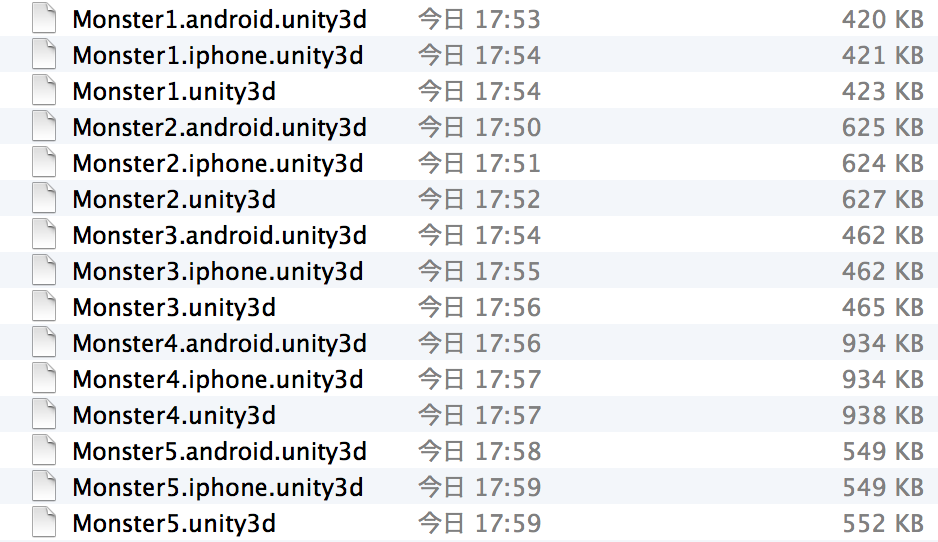
これでassetBundleを作成し直すと
下記の画像のように iphone用のとandroid用のができる
丸ごとアップロードしてダウンロードのパスを修正
 #if UNITY_ANDROID
		string url = BundleURL + bundleList[endDownloadCount] + ".android.unity3d";
#elif UNITY_IPHONE
		string url = BundleURL + bundleList[endDownloadCount] + ".iphone.unity3d";
#else
		string url = BundleURL + bundleList[endDownloadCount] + ".unity3d";
#endif
これでiphoneでもAndroidでも表示されました〜
今回はここまで
##今回の感想
始めて1から作成したから調べたりするのに時間がかかったり・・・でいろいろ苦労した。
一回やってしまえば覚えるだけなんだろうけど・・・。
最初の一回が大変だね。
今回はここまで